Introducing the New ServerlessQ SDK v2.0
Increasing Developer Experience Step by Step
We are excited to announce the general availability of ServerlessQ/Nextjs! 2.0 🎉
The SDK introduces some cool new features and enhancements, making development with ServerlessQ in your Next.js application even more effortless.
You can find the SDK docs here and the npm package here
Highlights
Adding Cron class to create Cron jobs from API Routes
You can now create Cron jobs using the SDK. It's as simple as creating a queue. Just define your expression, set a method of your HTTP call (e.g. GET, POST), define a relative a target URL, and give your Cron a name. Once this is set you can start to invoke your API route on the defined schedule:
// ./pages/api/db-stats-cron
export default Cron({
    handler: async (_req, res) => {
        // Business logic of checking db stats
        db.checkStats()
        res.status(200).json({ name: 'John Doe' })
    },
    options: {
        expression: "0 */10 * * ? *",
        method: "GET",
        name: "CheckDatabaseStats",
        target: "/api/db-stats-cron"
    }
});
You can set the path to the file where your Cron lives as the target. We replace it while deploying to ServerlessQ so it is reachable for you. This brings us to the next exciting enhancement 🔥
Creating queues & Crons automatically

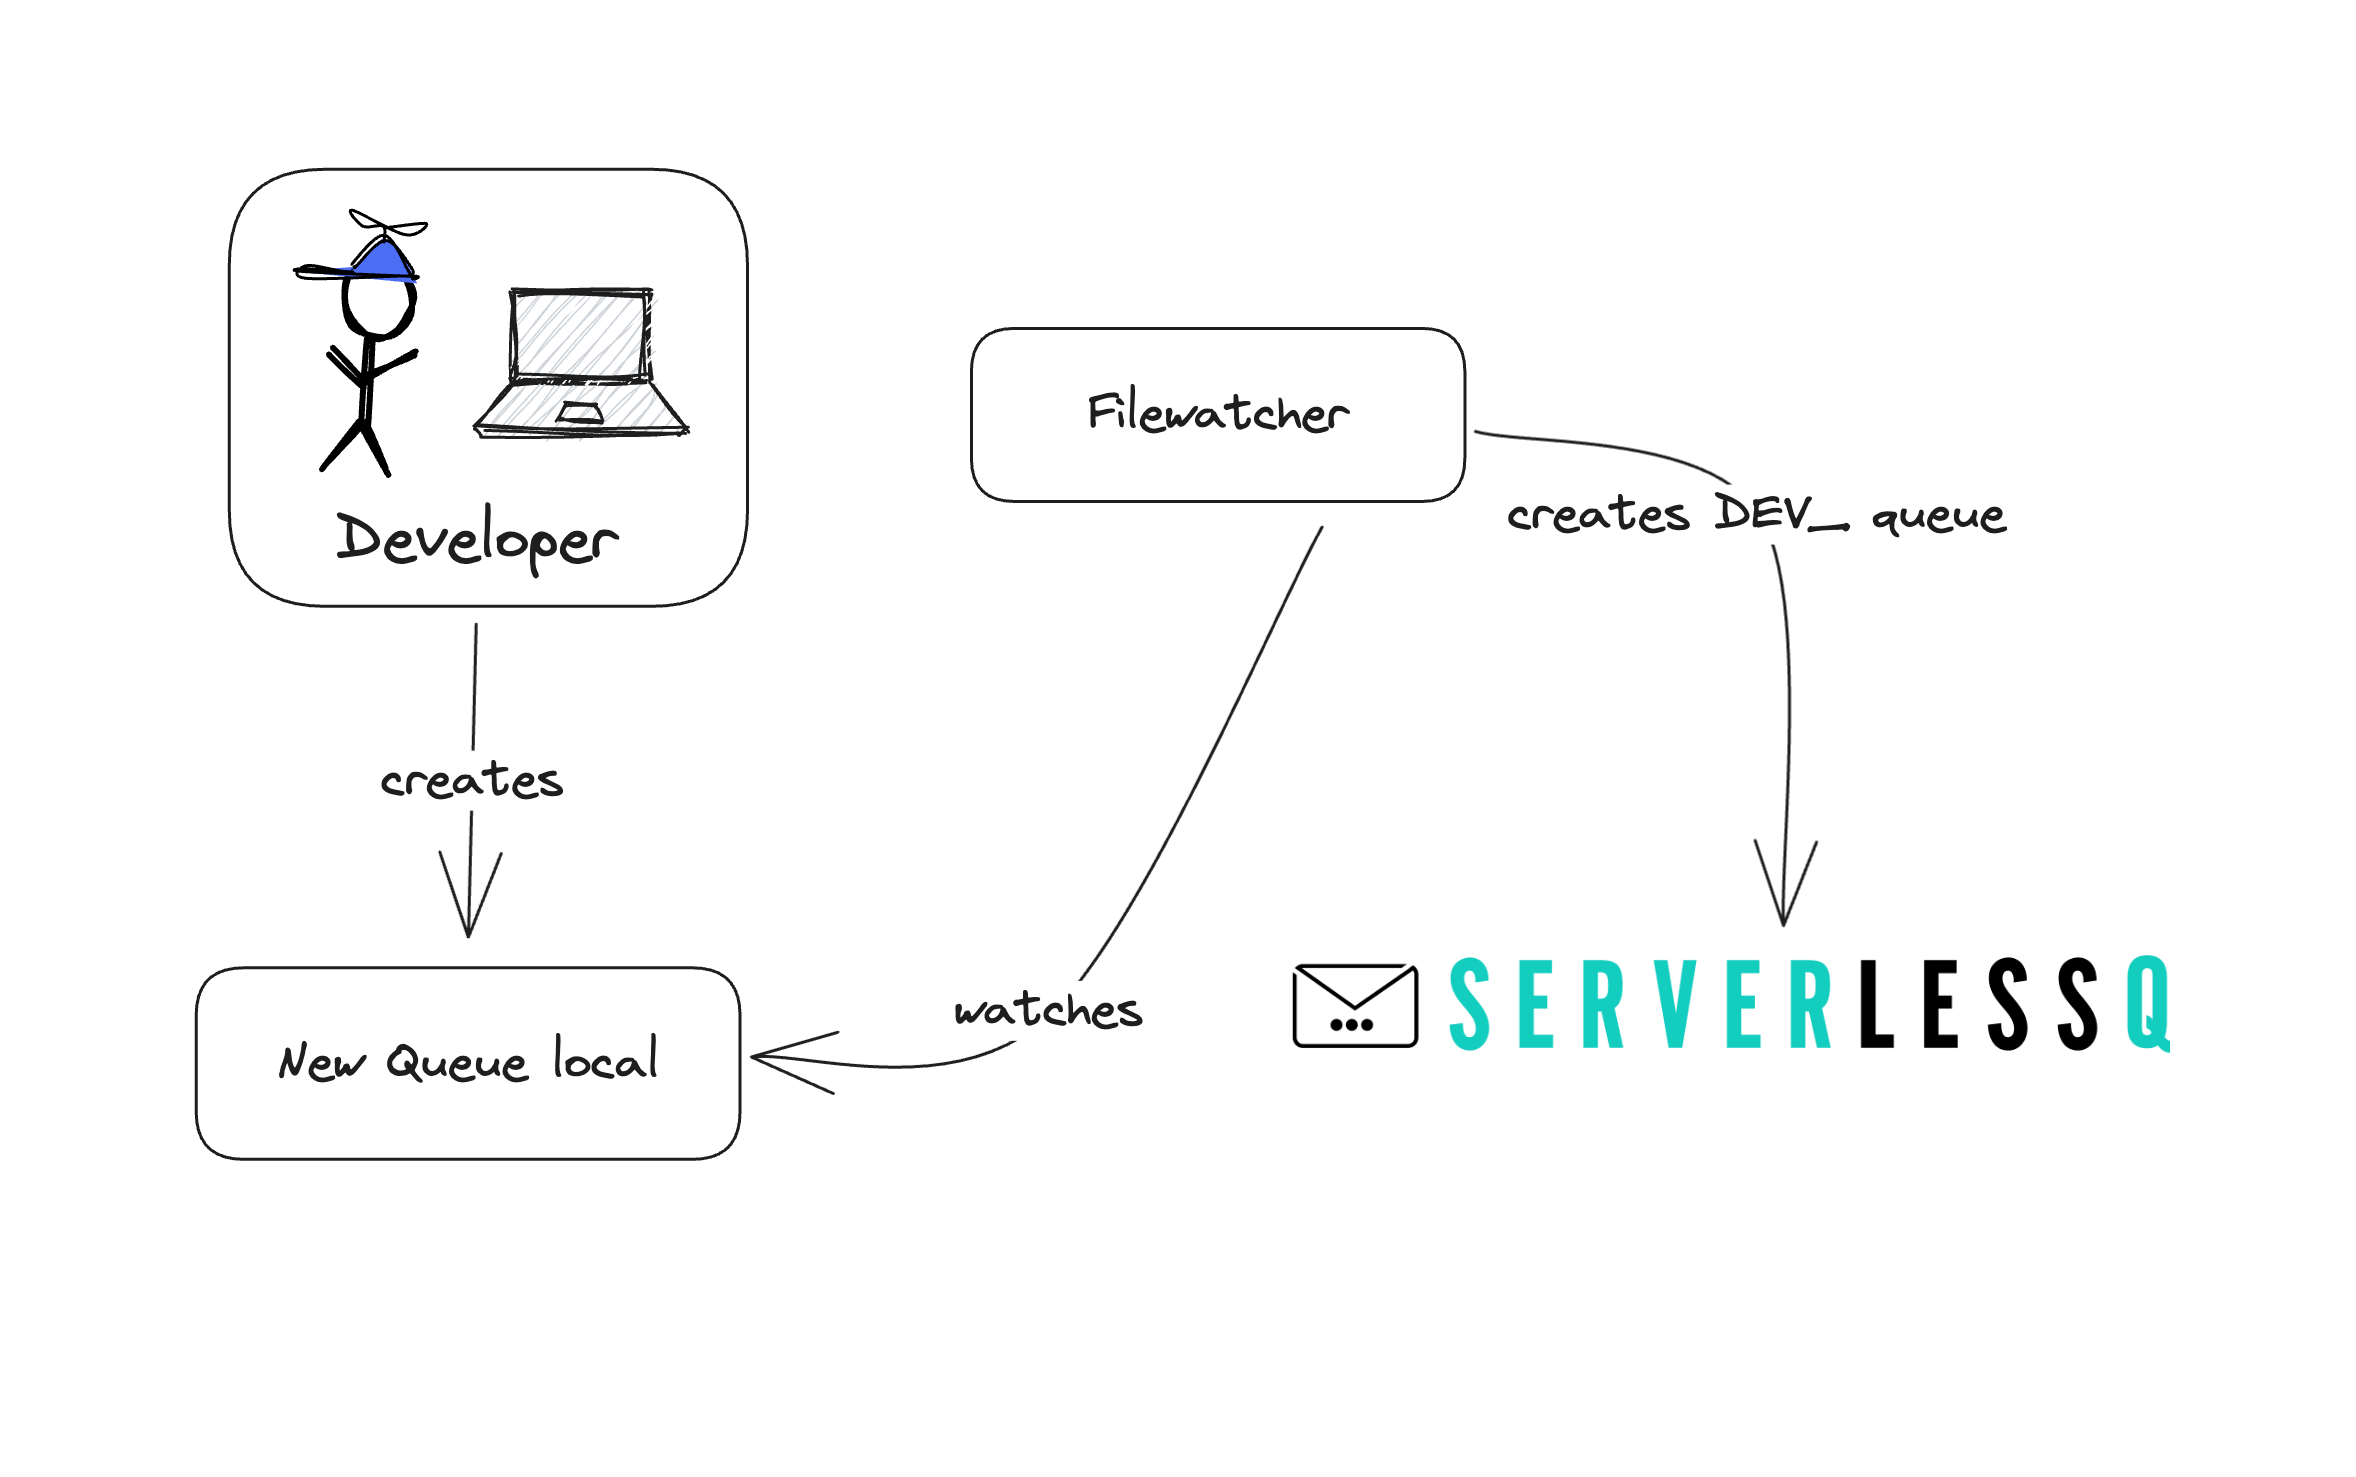
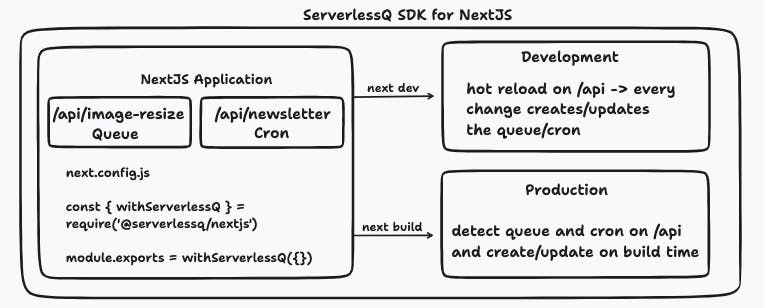
ServerlessQ now finds queues and Cron jobs automatically and deploys them to ServerlessQ. If you are in development mode, we will prefix them with DEV_.
This increases your local development experience, and there is no need to go to ServerlessQ first to create your Queue!
Deploy automatically during builds
We've also made your deployments easier. We don't want that you need to set up anything in the UI. This is why we've included an automated deployment during the build step. If you build a production version of your application, we will create your defined queues and Cron jobs automatically.
Prerequisite: You need to add withServerlessQ to your next.config.js
const { withServerlessQ } = require("@serverlessq/nextjs");

/** @type {import('next').NextConfig} */
const nextConfig = {
  reactStrictMode: true,
};

module.exports = withServerlessQ(nextConfig);
This will start the file watcher and the local proxy as we will see in the next release note.
Better Local Development Experience by Using a Local Proxy
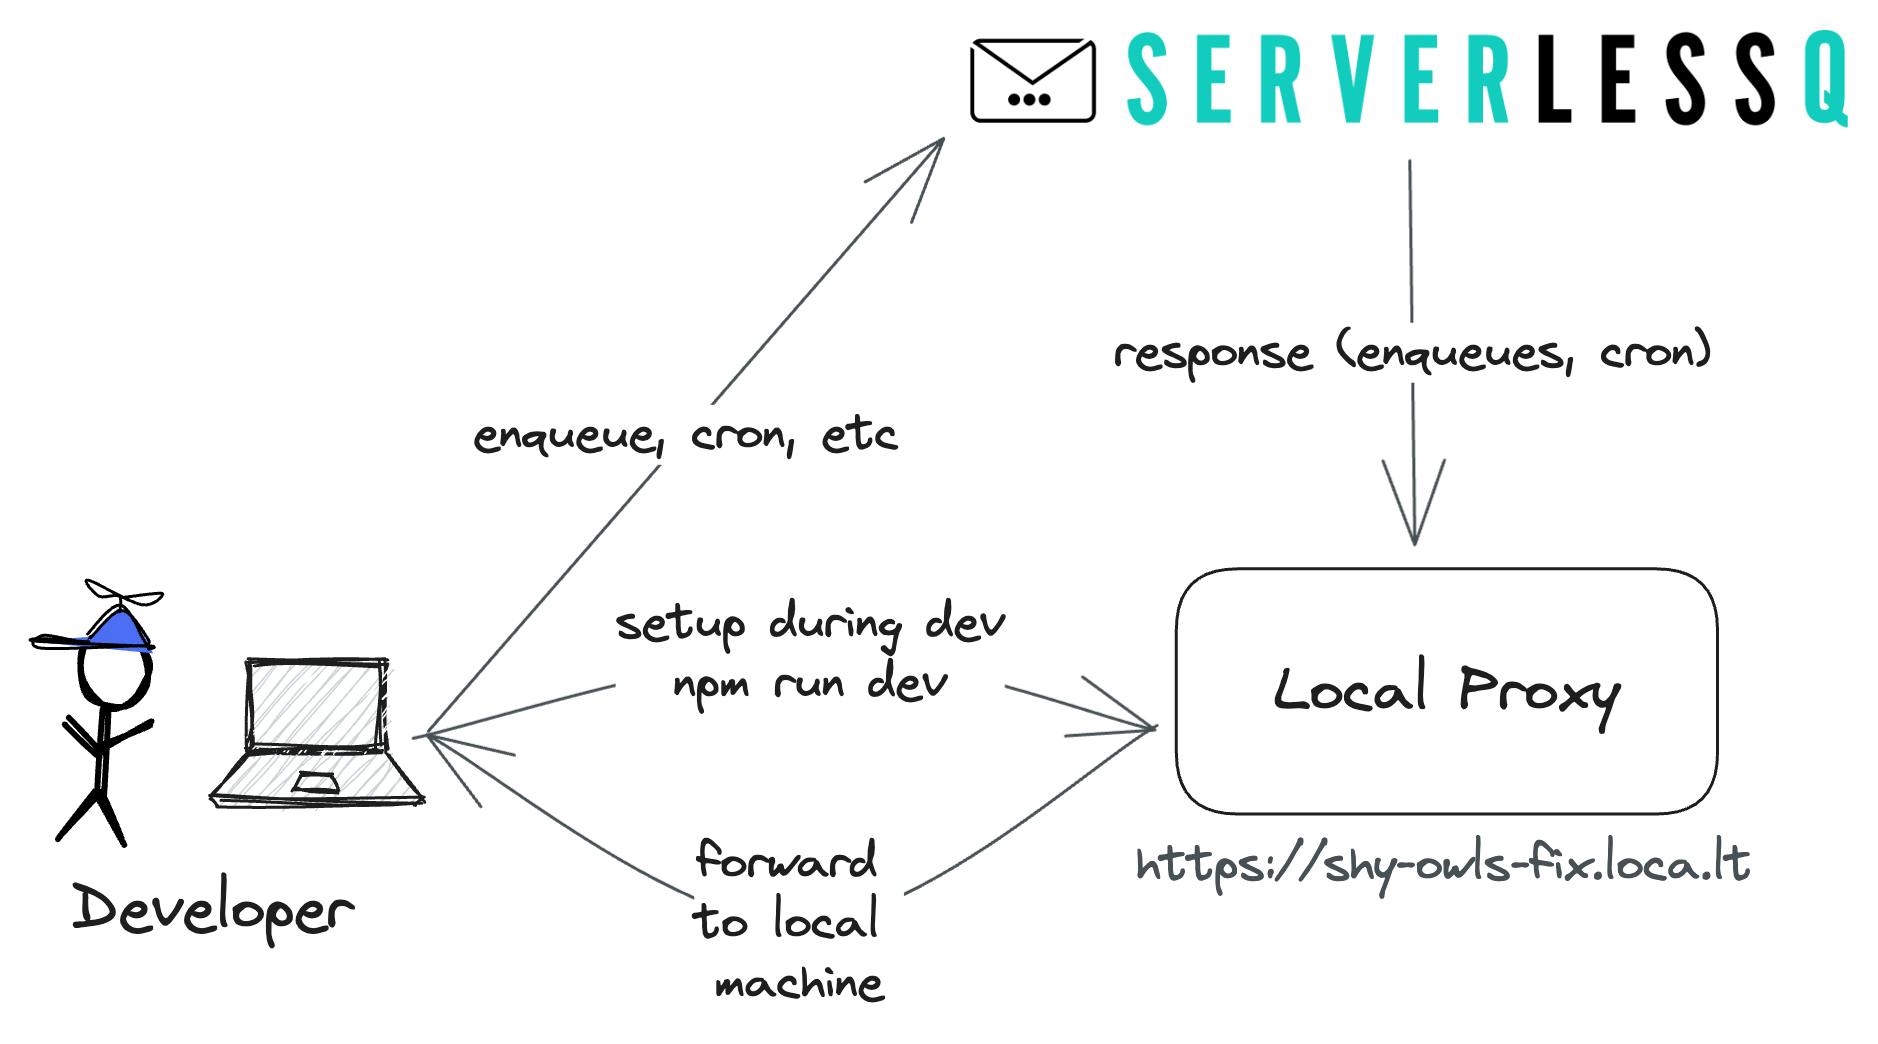
One feedback we received a lot is that the local development experience with ServerlessQ is bad. And that was true. This is why we've integrated a local proxy into the SDK.
What does that mean for you?
Once you start your dev server, you can interact with ServerlessQ as it would be in production. All traffic is sent back to your local machine during development.

If you're enqueuing a message, it will be executed on your machine and you'll see the logs locally. This makes iterating and testing much faster. Once you are done with development and deploy your project, the SDK uses the deploy origin to create the target for your queues and Crons.
The SDK is Open Source 🎉
We've decided to open-source the SDK. Why? We want to show you what we are doing with your data!
You can find the SDK here.
Starter Project
In this repository, you also find an example playground. Head over to examples/playground. You can now test the SDK out.
To get the playground running go to the repository's root and install all packages. We are using pnpm for that.
pnpm install
Create a .env.local file with your API Token. You find the token in your ServerlessQ Dashboard.
SERVERLESSQ_API_TOKEN=
After that start the playground by going into the correct directory and start the dev server.
cd examples/playground
pnpm dev # npm / yarn is working as well
How to Integrate the SDK in Your Own Next.js Project
To get all of the above benefits in your project, simply open your next.config.js file and add the following code:
const { withServerlessQ } = require('@serverlessq/nextjs')

const nextConfig = // ...

module.exports = withServerlessQ({nextConfig})
withServerlessQ will bootstrap your Next.js project and check for any queues or Crons you have created while in development mode or when building your app.
In the background, the following happens if you start up your development server:

How to Create a Queue With the New SDK
You can create a queue by adding a new file to the pages/api directory. Import the Queue class from @serverlessq/nextjs and export it.
We have full TypeScript support for the options. But here are some explanations:
name: The name of your queueroute: This needs to be the same as your file nameretries: How often do you want to retry failed messages?
// pages/api/image-queue

import { Queue } from "@serverlessq/nextjs";
import { NextApiRequest, NextApiResponse } from "next";

export default Queue({
  options: {
    name: "image-queue",
    route: "api/image-queue",
    retries: 3,
  },
  handler: async (_req: NextApiRequest, res: NextApiResponse) => {
    return res.status(200).json({ status: "Image transformed ✅" });
  },
});
The second argument is the handler function. This function is the business logic executed for each enqueued message. In the handler, you can access the request and response objects of your typical Next.JS API function.
Enqueueing a message
To enqueue a message, you need to import the queue and call the function .enqueue. Let's see an example:
// pages/api/enqueue

import { NextApiRequest, NextApiResponse } from "next";
import ImageQueue from "./image-queue";

export default async function enqueue(
  req: NextApiRequest,
  res: NextApiResponse
) {
  const result = await ImageQueue.enqueue({
    method: "POST",
    body: { path: "URL" },
  });
  return res.send("OK");
}
You can either do that in an API function or in getServerSideProps on your page. Just remember to keep your token hidden on the server and not expos it on the client.
Reusing an existing queue
You can also reuse existing queues. We provide a standalone enqueue function for this.
// pages/api/any-function-you-want

import { enqueue } from "@serverlessq/nextjs";
import { NextApiRequest, NextApiResponse } from "next";

export default async function handler(
  _req: NextApiRequest,
  res: NextApiResponse
) {
  const results = await enqueue({
    method: "GET",
    queueId: <your-queue-id>,
    target: "https://mock.codes/200",
  });

  console.log("results: ", results)

  return res.send(results);
}
How to Create a Cron in the New SDK
Similar to creating queues, you can also create Cron jobs with the SDK:
// pages/api/CheckDatabaseStats.ts

import { Cron } from "@serverlessq/nextjs";

export default Cron({
  options: {
    name: "CheckDatabaseStats",
    expression: "*/10 * * * ? *",
    method: "GET"
  },
  handler: async (_req, res) => {
      // Your code goes here
  },
});
Remember that we can only invoke your local code once your development server runs. We suggest using a bigger cron schedule for local development and setting the right one once you are satisfied with your code. The Cron will throw an error if ServerlessQ can not reach the target. These requests will also count toward your quota.
What about Target and Routes?
One important question for routing your messages to the correct host is: How do we know where to send the messages to?
Vercel
On Vercel the SDK knows it automatically by using the VERCEL_URL environment variable. You don't need to do anything.
Other Host
If you host your Next.JS application somewhere else, one additional environment variable is needed.
SLSQ_BASE_URL= <YOUR HOSTING URL> # e.g. https://myserver.com
This way, we will prefix your API routes with the URL from the environment variable where your queue or cron handler is hosted.
Wrapping up
Thats it! In summary, what we launched
Creating Queues and Crons from code
Deploying new queues and Crons automatically
Sending messages to your local environment with a local proxy
Our primary focus on this SDK was to increase the development experience. We don't want you to leave it for doing actions like creating queues or mocking requests. We are sure that this will help speed up your workflow a lot!
Let us know if you have any other feature requests in our Discord Channel 📫
Thanks🤞
